Annotation guidelines
Introduction
This introduction is inspired by the manual curation guidelines from the pea aphid genome, from Stephen Richards (Baylor College of Medicine) and Legeai et al. Insect Mol Biol 2010
A high quality genome sequence is a prerequisite for whole genome analyses but further, robust and complete annotations are essential for a genome to be fully utilized by the scientific community. Genome annotation involves mapping features such as protein coding genes and their multiple mRNAs, pseudogenes, transposons, repeats, non-coding RNAs, SNPs as well as regions of similarity to other genomes onto the genomic scaffolds. Many of these features can be automatically predicted by sophisticated software packages based on sequence or structure comparisons.
Beyond this point, it is the goal and the job of a community annotation to generate accurate lists of the most crucial and interesting genes from a new genome, with raw data in the form of gene predictions with numbers attached, gaps in the draft genome sequence, and transcriptome alignments. In short, the goal at this point, is to convert the raw, machine generated data into a useable and useful data resource that will advance research in new, powerful and exciting directions.
Some goals of manual annotation are:
- To establish almost exhaustive lists of genes playing a key role in some crucial process
- To look at your genes of interest enough to be comfortable that you have the right one’s before writing a paper.
- To provide names for the known genes – based primarily on homology to what is known in other organisms.
- To fix obvious errors in the automated gene models and improve them where additional data is available – i.e. to get the intron/exon co-ordinates right.
For all of the steps, we decided to use Apollo because it offers many functionalities facilitating the correction of gene structures and allowing users to probe, manipulate and alter the interpretation of gene models. Within Apollo, annotations can be created, deleted, merged, split, classified and commented on. For example, one can easily locate and correct incorrect splice sites or start/stop codons, classify a gene as a pseudogene, and even create a new alternatively spliced RNA.
Accessing the genome homepage
Each genome hosted on BIPAA have a dedicated home page, accessible from AphidBase, ParWaspDB or LepidoDB. Depending on the genome, the access can be restricted to members of the genome sequencing/annotation project. In this case, you will need to login with your BIPAA account that you must create on https://bipaa.genouest.org/account.
From the genome homepage, you get access to different web applications to explore and annotate the genome.
On this page there are 3 important elements
- At the bottom, a list of officially released data associated to this genome: usually an assembly, an automatic annotation (or OGS for Official Gene Set), and corresponding functional annotation (InterProScan, Blast vs NR, Blast2GO)
- In the middle, a search field allowing to search for you favorite gene based on its ID, or it’s functional annotation (e.g. type “gustatory receptor” to find all genes having a similarity with a known gustatory receptor)
- At the top of the page, a menu giving access to all the web applications you will need to manually annotate this genome: a Blast form, a genome browser (JBrowser), Apollo. You can also download the officially released data from the “Download” link in this menu.
For a brief introduction on the available resources for each genome, look at these introduction slides.
Overview of the annotation process
At the beginning of the annotation project, an assembly and an OGS (Official Gene Set) are officially released.
The OGS is the result of an automatic annotation usually performed using the Maker pipeline. Various data is used by Maker to generate this annotation, including RNASeq mapping data, alignments of transcripts and proteins from related species, masking of Repeated Elements.
Once released, the manual curation process can begin. Using Apollo, annotators are invited to manually check that their genes of interests were correctly predicted by Maker. When needed, modifications can be made to the structure of each gene. Finally, a minimum set of information must be associated to each manually curated gene: name, symbol, GO terms (Gene Ontology terms), …
To avoid mistakes, a personal report is generated each night for each annotators, giving access to the list of annotated genes, and the possible corresponding errors and warnings (missing symbol, wrong name, …).
Regularly, a new OGS is released: it is the result of merging the original OGS with the manual curation performed by annotators. When a manually curated gene is in the same location as a gene originally predicted by Maker, it is the first one that is kept, replacing the second. Gene ids are conserved between each OGS release, a suffix being incremented when a gene is modified (structure or associated information like name or symbol).
Each OGS will appear on the genome Homepage shortly after its release.
Using Apollo
Apollo allows to collaboratively improve the genome annotation, both by correcting gene structures and by adding information on gene models.
For a brief introduction on the available resources for each genome, look at these introduction slides.
A curation introduction and a detailed tutorial on how to use Apollo are available here (thanks to Monica Munoz-Torres!):
Detailed examples are available in these slides (thanks to Robert Waterhouse!).
You can also have a look at video recordings of these slides:
Apollo Introduction (by Dr. M. Munoz-Torres): https://www.youtube.com/watch?v=tIrvSbRhZdc
Apollo Examples (by Dr. R. Waterhouse): https://www.youtube.com/watch?v=BMeSwdKiO_E
Please note that the graphical user interface of Apollo have changed since theses slides and videos were done, see below for more up-to-date screenshots.
For all genomes hosted at BIPAA, we ask you to give a minimum set of information for each gene you annotate. When right clicking on a gene in the “User-created annotations” track, you can click on “Open Annotation” to show a panel which should look like this on the right side of your web browser:
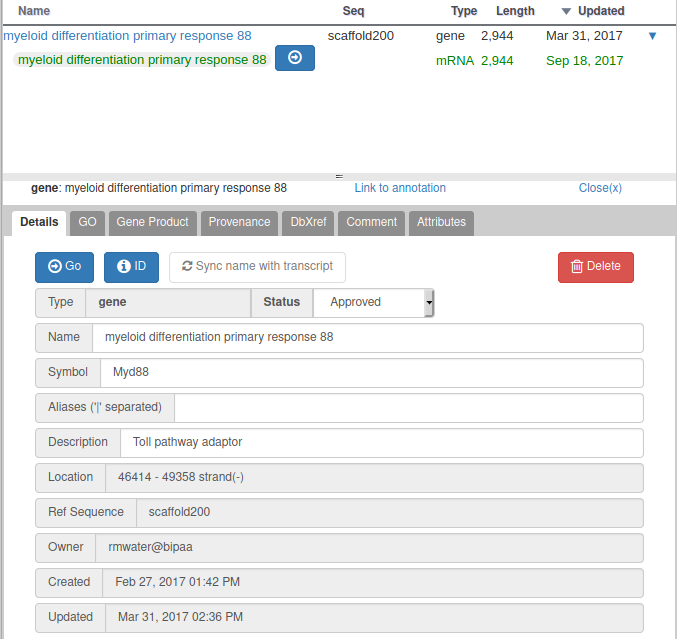
With Apollo, you can edit information at the gene level, or at the mRNA level. This is especially useful when you annotate a gene having multiple isoforms. When clicking on the “Open Annotation” menu, the panel above concerns the gene level information. You can switch to between the gene and mRNA level by clicking on the gene/mRNA names:

If the gene you are annotating does not have multiple isoforms, you should only care about the gene level information. The empty fields at the mRNA level will be automatically copied from the gene information when releasing subsequent OGS releases.
For each gene, we ask you to at least:
- Give a name (human readable long name, e.g. : gluthatione s-transferase)
- Give a symbol (must be unique, must not contain space, “_” is allowed, e.g.: GST or GR154)
- Assign a status to the gene
- Assign the gene to an annotation group (see below)
In the description field you can optionally add a longer description of the gene name if necessary (see example above).
Please pay a particular attention to the following points :
- Follow the naming rules for your gene family (see “Gene nomenclature” below)
- Name or symbol should not be ID (like DV0000000-RA). BIPAA will manage the ID assigned to genes when releasing OGS.
- Do not add any organism prefix such as “Dv-“
- In most cases, when you have sufficient supporting evidences (RNASeq, Alignements, …) and/or the gene looks ok compared to orthologs, do not add “putative” to the gene name.
- In borderline cases, when you are really not sure of the gene annotation (e.g. low sequence similarity) you can add “putative” to the gene name. Anyway, do not use “similar to“, “-like” or any other synonym.
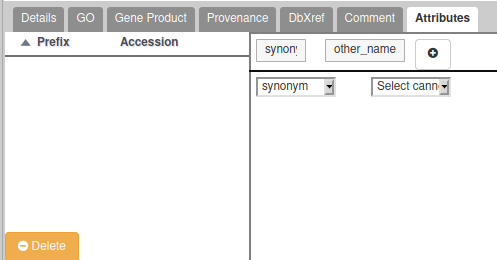
- If the gene you are annotating have multiple possible names/symbols, use the preferred ones as the official name and symbol, and add the other ones in the “Attributes” section as synonyms: In the Tag column, select the “Synonym” which should appear in a drop-down list. In the “Value” column, write the alternate names or symbols. See the following screenshot for an example (click on the “+” to validate):
If the gene you are annotating have multiple isoforms, you should populate the mRNA form for each isoform, in particular :
- Add a letter (A, B, C, …) at the end of the name to distinguish each isoform (e.g. : gluthatione s-transferase A)
Annotation status
There are 3 possible statuses for a gene:
- Needs review: you have begun annotating this gene, but it’s not finished.
- Approved: you consider the annotation finished for this gene (errors and warnings can still appear in the validation report, see below).
- Deleted: if you want to permanently remove a gene in the next OGS. Typical usage is that an mRNA was predicted during the automatic annotation, but you are sure that there is no mRNA at this location. In this case, drag the problematic mRNA to the annotation track, copy the mRNA id in the name field (e.g. DV0000000-RA) and set its status to Deleted. The mRNA will be removed in the next OGS. If the gene have multiple isoforms, other isoforms will be kept. Note that when you want to split a gene in multiple small genes, you don’t need to mark as deleted the original gene, it will be deleted automatically.
It is up to each group leader to decide who should approve each gene. In some groups the leader will choose to be the only one to approve a gene, in other groups the leader can decide to trust each annotator.
Annotation groups
Assigning genes to an annotation group is necessary to ease tracking of the progress of the annotation project. Groups are defined by the leader(s) of the project, and correspond to families of genes you have been assigned the annotation. Each group leader will be in charge of reporting/summarizing the scientific results of the annotation to the project leaders.
To assign a gene to a group, add a new Attribute in the “Attributes” section of the gene. In the first list, you must select “annotgroup” which should appear in a drop-down list. In the second list, select a value from the full list of annotation groups. Don’t forget to click on the “+” button to validate.
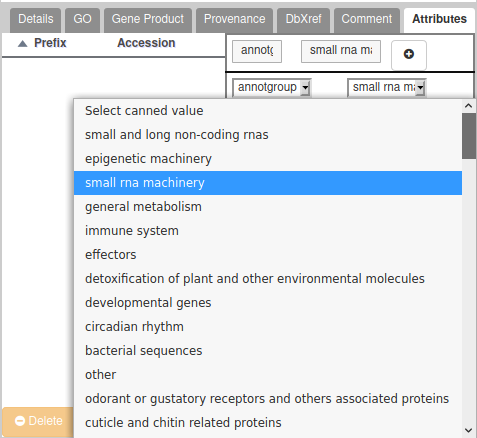
If you annotated a gene which belongs to no specific group, you have two solutions:
- If you would like to annotate a new family of genes, get in touch with us and we will add a new group to the list after evaluating it with the project leaders.
- A special “other” group is also available. It should only be used for a few genes you find interesting but are not specifically targeted by the annotation project.
You can also add more (optional) information for each gene:
- Some external references (DBXrefs, e.g. UniProt ID) (DbXref tab)
- Some publication using their PubMed ID (DbXref tab)
- Gene Ontology terms: see below
These fields are not mandatory, but it’s always good to collect as much information as possible while annotating.
Gene Ontology terms
Gene Ontology terms allow to tag a gene with terms from a controlled vocabulary, corresponding to molecular functions, biological processes or cellular components.
Recently, Apollo introduced a new form to add GO terms to a gene. From the “GO” tab of a gene, click on the “New”, button. You will see a form looking like the following example screenshot:
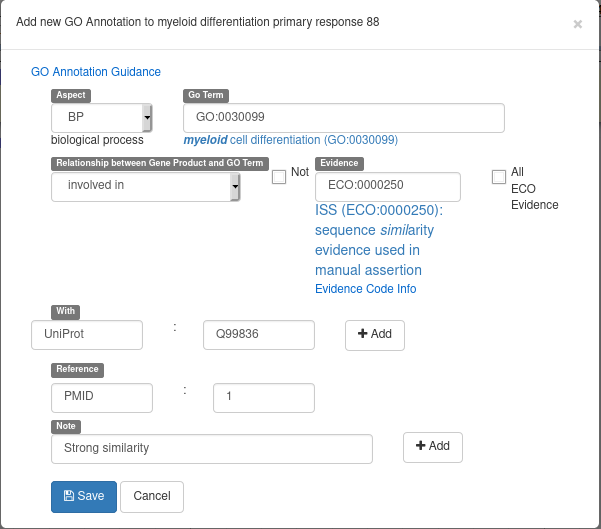
Here’s the meaning of each field:
- Aspect: select a Gene Ontology branch (MF for molecular functions, BP for biological processes or CC for cellular components)
- Go Term: select the GO term to associate to the gene (write free text, a list of suggestions will appear)
- Relationship between Gene Product and GO Term: select the kind of relation between the gene and the select GO Term
- Not: check to reverse the selected relationship (e.g. not involved in)
- Evidence: ECO ontology term describing why you want to associated a gene and a GO-Term (write free text, a list of suggestions will appear)
- With: optional id of an element used as an evidence (in this example, the evidence is a similarity with the Q99836 UniProt record)
- Reference: optional pubmed id of an article supporting your annotation
- Note: free text comments
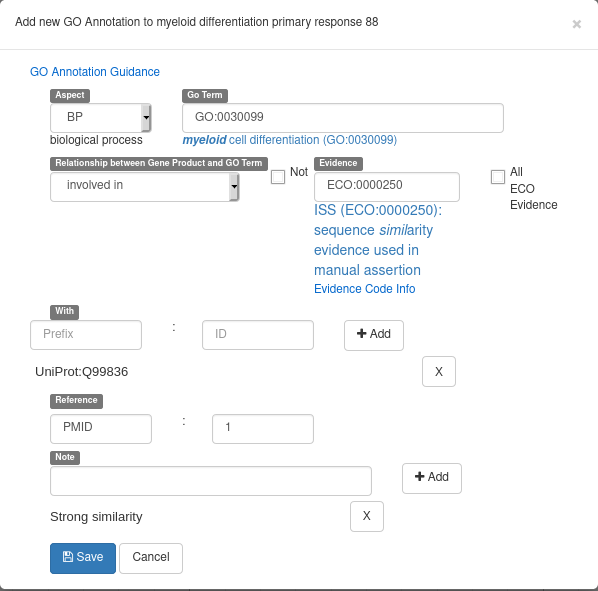
Don’t forget to hit the “Add” button when adding a “With” of “Note” element. The form should look like this before hitting the “Save” button:
Particular cases
Gene X is truncated on one end
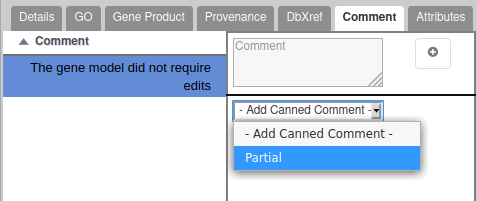
In case the gene you are annotating is not complete because it is on the 5′ or 3′ end of a scaffold, and you couldn’t find the other part of the gene on another scaffold, add the word “Partial” in the comment tab of the annotation editor.
Gene X is incomplete/missing an exon
In rare cases you may find that a gene is incomplete because some internal exon is missing, e.g. a 4 exons gene found on a single scaffold, but exon 3 is not present in the scaffold sequence.
In this case, you should create one gene model for each part of the gene, each one having a “Part“ attribute (the value must be the number of the fragment, starting with 1 at the 5′ end of your gene) and the word “Partial” in the comment tab of the annotation editor.
Gene X is spread over 2 scaffolds
Because genomes can be very fragmented, it is often the case that your gene is not completely included in one unique scaffold. For these cases, you have to annotate separately the two fragments, but use the same name and symbol. For each part of the gene, you have to add an attribute in the “Annotation editor”. Select “Part” in the first column, and the value must be the number of the fragment, starting with 1 at the 5′ end of your gene.
Be careful if the end of the exon in the previous part does not stop at the end of a codon. You have to change consequently the translation start of the first exon int the next part.
If a part is missing between the 2 fragments, you should had the word “Partial” in the comment tab of the annotation editor for both fragments.
Gene Y is present in multi copy, caused by unassembled alleles
In some cases you can find 2 complete versions of the same gene of interest in the assembly. If you think that these 2 versions are not real duplications but the results of 2 unassembled alleles, annotate the 2 alleles, give them the same name and symbol but add the attribute “Allele” (tag column) with the value A or B.
Gene Z is spread over 2 scaffolds AND have multiple copies
Just add the 2 “Part” and “Allele” attributes for each fragment/copy.
How automatic and manual annotation will be merged?
The merging is done by looking at overlaps on CDS of automatic and manually annotated genes. In most cases this proved to work well on other genome projects. If you encounter more exotic situations (e.g. you want to replace a specific gene from the automatic annotation, or you want to keep both automatic and manually annotated gene), please contact us and we will guide you on how to properly annotate it.
Correcting the genome sequence
While annotating a gene, if you think the genome sequence is wrong and that the gene you’re annotating is impacted (e.g. wrong ORF), you have the possibility to add alterations to the sequence (insertions, deletions, mutations). Please make these corrections only if the sequence modification is well supported (by RNASeq for example). Also keep in mind that, while at some point in the future we could use this information to generate new versions of the genome assembly at the same time as new OGS release, this is not currently the case. It will only allow you to export correct transcript and protein sequences for the affected genes.
Gene nomenclature
Giving correct names and symbols is important, but not always easy.
Some gene families have very well established rules to assign gene names (e.g. based on orthology with model species). In this case, annotators should follow these rules.
In other gene families where no consensus has been made in the scientific community, annotation group leaders should define rules to name the annotated genes. These rules should be clearly defined, and documented on this page. Please contact us if you want to add rules for a new gene family.
Validation of the annotation
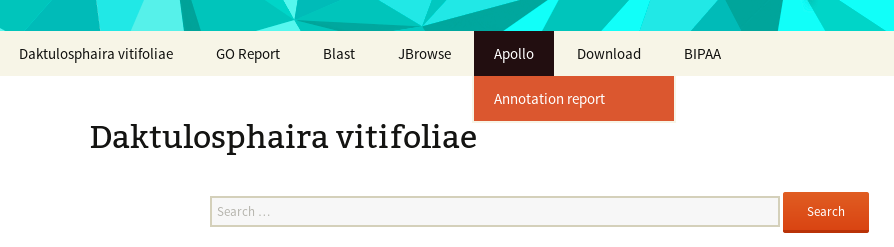
To check that your favorite genes were correctly annotated, a report is available following the “Annoration report” link in the top menu.
It is updated every night, and it contains the list of genes that you created. Each gene can be associated with some warnings and/or errors.
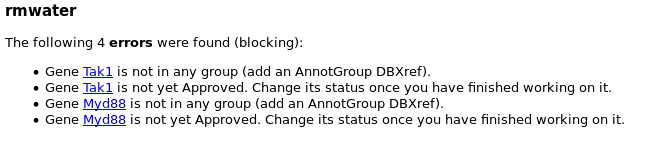
Errors are things you must correct to make your gene correctly annotated. Genes with errors will not be included in the next OGS release.
Warnings are minors hints we give you because we found something potentially wrong in the annotated gene. You should double check that everything is ok with this gene. Genes with warnings are included in the next OGS release.
Finally, hopefully, most of your genes will be ok. In this case, we will be able to include them in the next OGS release.
Please not that only Approved genes will be included in the next OGS release.